Interested in Challenge Packs?

Sunday, December 18, 2011
Blog help needed
I'm having major issues with my blog template. If anyone has tips please be kind and send them my way! The interactive format wasn't working well, but when I tried to revert to the original format it snow very very basic. Not really sure what to do!
Turkey Stuffed Baked Peppers
This one was WAY our of our comfort zone, especially for Mark. But he's a good sport and let me try something new. In the end he even declared this a victory, and I promptly fell out of my chair. I think this started as another Biggest Loser inspiration, but to tell you the truth I honestly can't remember. We made it way back in late October (I think), so it's a little spotty. Just to note, the below instructions were for just the two of us.
Ingredients:
1/2lb ground turkey (we had lots left over, which went into the freezer for later)
1/2C chicken stock
1 red pepper
1/2C diced onion
a dash of cayenne pepper
a dash of chili pepper
some season salt
(feel free to add other Mexican inspired seasonings too!)
Cook the meat, onions, and seasoning until browned. Place about 2oz of cooked turkey into each half of pepper and place in a baking dish. Cover peppers with chicken stock and sprinkle additional seasoning on top. Cover with foil and cook for 20 minutes at 300F. Remove and enjoy!


Creamy Onion/Chicken soup
I'm warning you, I love soup in the winter so you're going to see a lot of soup recipe variations this winter. If you don't like soup, then we'll see you again next spring.
For dinner the other night I decided to mix things up a little and add a can of low-sodium cream of onion soup to our recipe. It was warm and delicous!
Ingredients:
1 chicken breast (frozen)
1 carrot, skinned and dimed
1/2 C of celery, chopped
1/2C onion
1 can, cream of onion soup
1C egg noodles

Add everything to the crock pot (except the noodles) and cook on low for 8-10 hours. A 1/2 hour before serving, add the egg noodles to cook. Remove the chicken and shred using a fork and steak knife, then add the chicken back to the soup. Serve and enjoy!
Quinoa
This is going to be a short post because the directions are very similar to my couscous directions. This is another one of those fabulous grains that not only provide a healthy meal, but heat up well for lunch the next day! The main difference is that quinoa has one full serving of protein! It takes slightly longer to make and we don't like the taste quite as well, but it's a nice alternative.
I'll provide general directions, but it's smart to follow the preparation directions outlined on the product packaging. Quinoa is prepared similarly to couscous, although you add the quinoa grains to the water before it boils. You also have to let it steam for 10-15 minutes rather than 5. This also doesn't come with seasoning (although if you find a brand that does, let me know!), so I added some butter and lots of Mrs. Dash to it after it was done steaming. Otherwise my prep instructions are the same as for couscous, and we like to mix it with turkey and add a veggie. It's very filling and made enough for 3 days of lunches in addition to our dinner!

I'll provide general directions, but it's smart to follow the preparation directions outlined on the product packaging. Quinoa is prepared similarly to couscous, although you add the quinoa grains to the water before it boils. You also have to let it steam for 10-15 minutes rather than 5. This also doesn't come with seasoning (although if you find a brand that does, let me know!), so I added some butter and lots of Mrs. Dash to it after it was done steaming. Otherwise my prep instructions are the same as for couscous, and we like to mix it with turkey and add a veggie. It's very filling and made enough for 3 days of lunches in addition to our dinner!

CousCous
My first memory of couscous comes from my sophomore year of college. There was a girl on my floor that freaked out with happiness every time the dining hall served couscous. It reminded me too much of rice (which I loath) so I've never tried couscous. Well, I read an article a while back about how couscous is one of those easy meals that is not only good for you, but is an easy meal for lunch the next day. Then on my first flight to China they served couscous with our meal, so I tried it and it wasn't bad!
I've since come to love couscous, not only for it's simplicity, but for the fact that it DOES truly make a fantastic lunch the next day. It keeps and heats up very well. And it only takes 5 minutes to cook at night for a meal! On our busy schedule this is golden.
Ingredients:
1 box Near East couscous (pick any flavor you like)
4oz shredded turkey or chicken
2C veggies of your choice (broccoli works well)
Over the weekend I will toss either a few chicken breasts or turkey fillets in the crock pot with some seasoning (usually Mrs. Dash sodium free garlic and herb) and about 1/4C Swanson's organic chicken stock. I'll cook it on high for a few hours until it's ready to shred. Then I'll stock the freezer for the week, making meals super fast during our hectic work week. This shredded meat is perfect to mix with couscous (or quinoa - bet you can't wait to hear about that one!)
Couscous takes 6 minutes to make. You boil 1 1/4C of water mixed with the seasoning packet and a tiny bit of butter. Once it boils (approx. 1min) you add the couscous, stir, and cover for 5 minutes. Don't forget to turn the heat off! While it's steaming, I heat up the turkey (1min on high) and steam the veggies (2 min on high) in the microwave. Voila - a quick and easy 6 minute meal, that is not only healthy but provides left-overs!


Pomegranate
My co-worker introduced me to eating pomegranates recently. I've always loved the flavor, but have never had the actual fruit. After a quick tutorial from her, I tried it on my own. It takes a while to get the hang of it, but this fruit makes a great addition to your breakfast AND is full of antioxidants.
First, you cut the fruit in half then score the edges of each half about 4 times. Fill a large bowl with water and submerge one half of the fruit, gently pulling apart the seeds. The white part will float to the top and the seeds will sink to the bottom. Use your hand to scoop the white stuff off the top. I'll usually remove the large pieces as I got and set them aside to compost.
After repeating this with the 2nd half, turn the bowl over into a strainer to remove the water. I'll then separate the seeds into several containers for the week and take them for my breakfast. It takes a bit of time to get used to eating the seeds because some can be a bit crunchy, but they are juicy and delicious.


Veggie Chicken Soup
Well, we finally got around to moving all my pictures off my computer so I can upload new ones and post about all the concoctions I've been coming up with. The old lady (aka my computer) just can't take too much anymore and fills up quickly! Here is another yummy soup recipe that we tossed together a few weeks ago. Our goal is to add more veggies into our meals, and adding multiple veggies to soup does the trick without your palate even knowing! Doesn't soup just hit the spot in the winter? It's an added bonus when you come home to a hot meal in your crock pot and don't have to do any dinner prep!

Veggie Chicken Soup
1 chicken breast - frozen
1C frozen corn
1C diced tomato (I used the frozen blanched ones I made this fall)
1/2C chopped celery
1/2C diced red pepper
one box Swanson's organic chicken soup broth (equal to about 4C, I think)
seasoning of your choice (I tend to use Mrs. Dash sodium free garlic and herb seasoning in a lot of our recipes)
*Note: I like to use frozen components because we tend to set our crock pot to start a few hours after we leave for the day. This helps preserve them and ensure we don't get food poisoning.
Add all ingredients to crock pot and cook on low for 8-10 hours. Before serving, remove chicken and shred. I've found it works best to use a fork and steak knife. Re-add the chicken to the soup before serving.
Wednesday, October 26, 2011
Frozen Carrots
The last veggie remaining from my farmer's market trip were the carrots. I've been using them in recipes and have cut them up for Mark's lunches, but still had a ton left. Then my super mom saved the day (again) and recommended I blanch them like I did the tomatoes. First, though, I made her promise it wouldn't be as slimy as when I did the tomatoes. Blanching carrots was super simple and now we have MORE fresh veggies in the freezer for the winter!

Note: timing is very important
 I plan on using my carrots in soups and stir fry recipes this winter. How will you use yours?

Note: timing is very important
- Peel and dime carrots
- Bring a pan of water to a rolling boil
- put carrots in the boiling water for 2 minutes
- After the 2 minutes, strain carrots then put in a fresh bowl.
- Immediately pour cold water over the carrots and leave for 2 more minutes.
- Strain carrots again then lay on a paper towel to dry for another couple of minutes. It's important that they aren't too wet when you freeze them.
- After the carrots are thoroughly drained, separate and place in plastic bags for freezing.

Tuesday, October 25, 2011
New Format
Ok, friends. I actually had a few minutes at home tonight and started playing around with the blog format while watching "Biggest Loser". I'm not 100% sold on this new format, but tell me what you think! Do you like the new format? Anything you miss from the old one?
Barley Beef Soup
Last winter I tried a barley beef soup for lunch (the restaurant was all out of chicken noodle) and it surprisingly wasn't too bad! I'm not one for "new" things (aka anything that's not super basic, like chicken or noodles), so it is pretty far outside my comfort zone to try barley. So this winter as I'm trying to come up with new recipes to aid in our healthy eating quest, I decided to get some barley and attempt to recreate the soup.
The first challenge was finding barley. Oh, it is not as easy as you'd think. Finally I found it in the natural food section of the grocery store, and in the process found couscous too! Oh just you wait until I post my recipe for that. The rest of the ingredients were simple, some even left over from my massive farmer's market run. It didn't take too long to pull it together, and let me tell you, there's nothing better than coming home to a hot, tasty dinner that you didn't have to spend an hour cooking after work!
Ingredients:
4oz beef broth (one box of Swanson's works)
stew beef, cut into small chunks
1C pearl onions, chopped
1C celery, chopped
1C carrots, dimed
1/4C pearl barley
1/2 tsp Penzy's chicken/beef rub

Cut vegetables and add to meat, broth, and barley in a crock pot. Stir in the seasoning and mix all ingredients well.

Cook on low for 7+ hours, or on high for 4-5 hours. A friend mentioned that barley can get sticky if cooked for too long, but ours was in the crock pot for almost 9 hours and it was just fine.

The left-overs came to lunch with me the next day and let me tell you, it tastes just as good the 2nd day! This recipe is definitely a keeper. We paired it with the homemade "cracker" flat bread recipe and yum, that is my new favorite thing. I will be making that with as many dinners as I possibly can this winter!
Friday, October 21, 2011
Freezer Pasta Sauce
I have posted a similar recipe to this in the past, but made it on a large scale this time in order to freeze it for the winter. It was great because I got to use all the fresh veggies from my Farmer's Market journey. This made enough pasta sauce for at least 4 meals for the two of us. It will be nice to dig this out during the winter months when we need a hot meal and don't feel like cooking. It also helps us towards our goal of eating organic, fresh food.
Ingredients:
8 cups tomatoes, cut into chunks
9 T olive oil
1 entire head of garlic
2 cups of pearl onions, chopped
sea salt and pepper to taste
Start by washing and cutting the tomatoes into chunks. I like to cut them into quarters, which makes it easier to cook.
 Break your head of garlic into the individual cloves, and remove the skins.

Place the olive oil into a large, deep skillet on medium heat. Use a garlic press to insert the garlic into the hot oil. I like to use a wooden spatula to stir the garlic frequently to prevent it from burning. Cook garlic for about 2-3 minutes until fragrant.


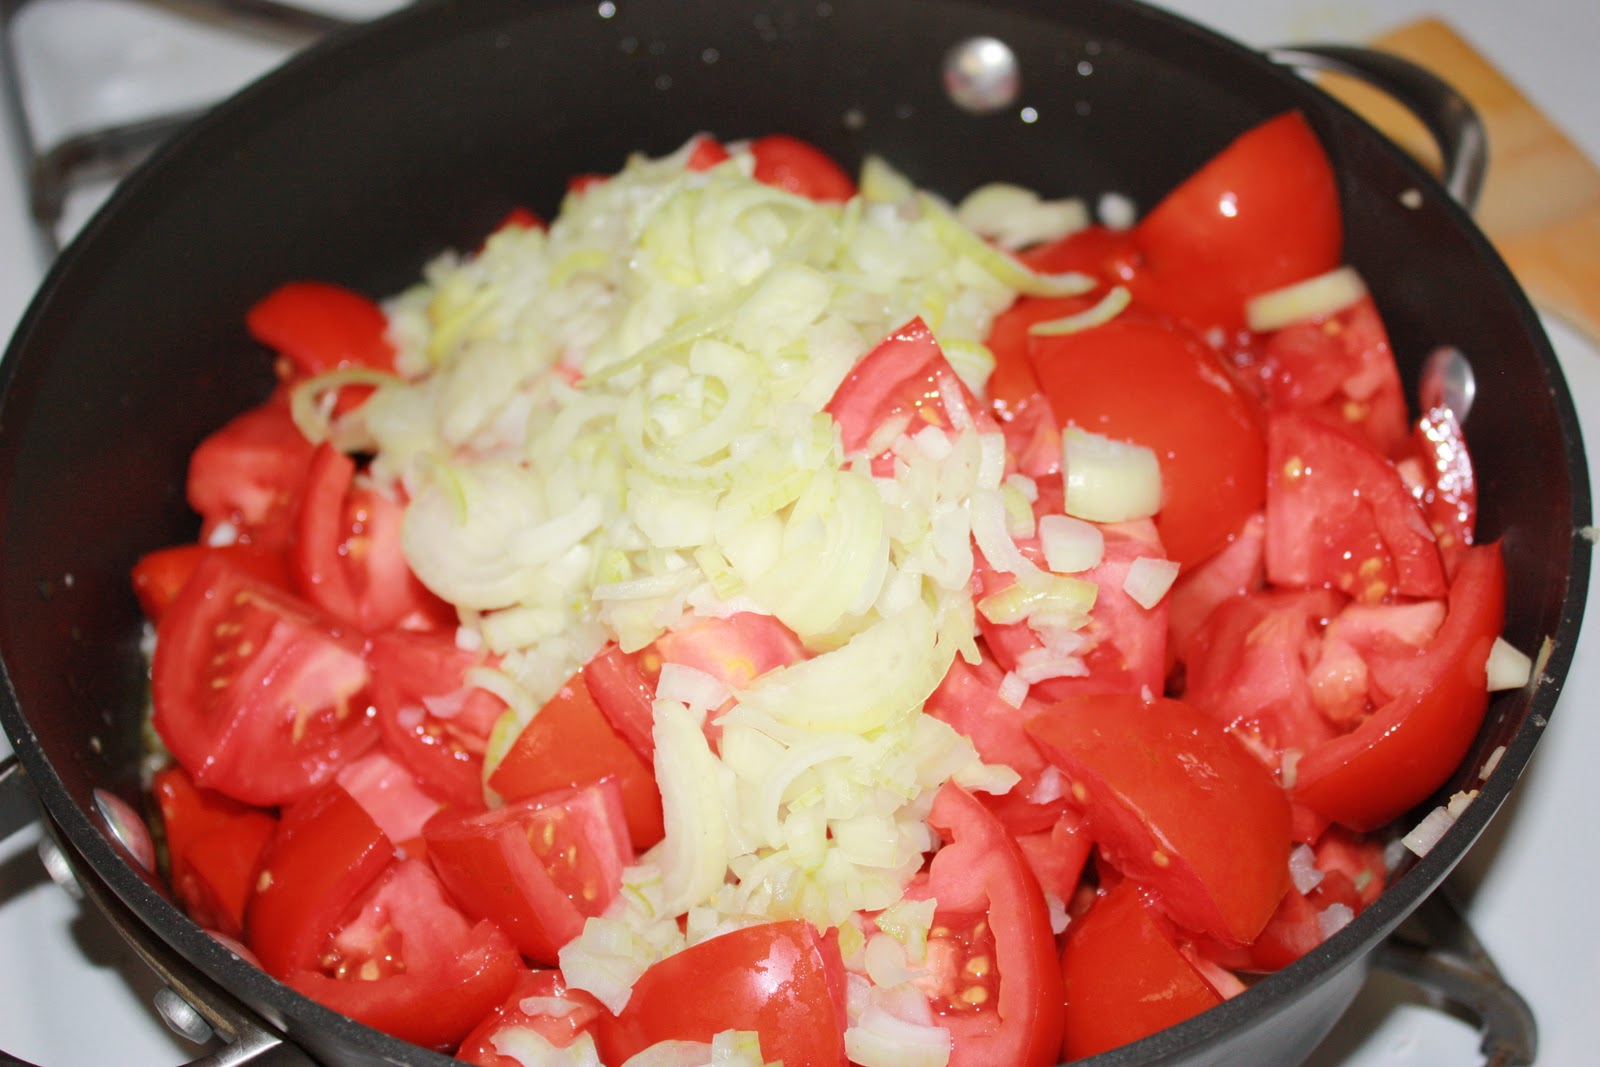
Add the tomatoes, onions, salt, and pepper to the skillet. Cook for about 15-20 minutes, stirring frequently. The tomatoes will begin to break down. As that happens begin using a fork or a potato masher to break the tomatoes apart. Keep cooking for about another 5 minutes until the tomatoes are completely mashed and mixed in.


Ingredients:
8 cups tomatoes, cut into chunks
9 T olive oil
1 entire head of garlic
2 cups of pearl onions, chopped
sea salt and pepper to taste
Start by washing and cutting the tomatoes into chunks. I like to cut them into quarters, which makes it easier to cook.


Place the olive oil into a large, deep skillet on medium heat. Use a garlic press to insert the garlic into the hot oil. I like to use a wooden spatula to stir the garlic frequently to prevent it from burning. Cook garlic for about 2-3 minutes until fragrant.


While the garlic is cooking, cut pearl onions into slices then chop with a large knife. You don't want the pieces too big.


Add the tomatoes, onions, salt, and pepper to the skillet. Cook for about 15-20 minutes, stirring frequently. The tomatoes will begin to break down. As that happens begin using a fork or a potato masher to break the tomatoes apart. Keep cooking for about another 5 minutes until the tomatoes are completely mashed and mixed in.

Freeze sauce in manageable portions by using an ice cube tray. I also put a larger portion in a freezer safe Tupperware container for later this winter. Come on over for a pot luck/game night and maybe you'll get to try it out!

Tuesday, October 18, 2011
"Blanched" Tomatoes
I learned how to blanche tomatoes this week. Last weekend I purchased a basket of tomatoes. Little did I know that meant I had WAY too many tomatoes to use. I used a bunch to make home made pasta sauce, but still had a ton left over. Mom suggested I blanche, skin, and dice them to use in receipes all winter. Well, my first question was "what the heck is blanching?". It is actually an easy process, but I'm warning you now that the process that follows blanching is messy, slimy, and gross. But I'm hoping that it was all worth it as I pull out fresh, organic tomatoes during the frigid winter months.

Boil a large saucepan full of water. The water must be deep enough to cover the tomatoes
Dunk a tomato in the water for 30-40 seconds
Use tongs to remove tomato from the hot water
I left the tomato on the cutting board for a minute to cool while I continued blanching. Next, use a sharp knife to cut out the place where the stem connected to the tomato. Once this is removed you can easily grab an edge of the skin and peel it off the tomato. This is where it gets slimy!! After the tomato is peeled, use the knife to dice the tomato and put in a zip lock bag to freeze. Just be prepared for all the juice and slime! I was not, and ended up having to wash the fronts of my cabinets.
Monday, October 17, 2011
Crock Pot Cinnemon Applesauce
This is one of the most wonderful things to make in the Fall. It's perfect for a crisp day, and makes your house smell delicious.
Pick (or purchase) several fresh apples. I use 8 apples for this recipe. Harrelson apples are the best for applesauce. Peel the apples thoroughly. The sauce will not taste right if you leave even a speck of peel on the apple. Core the apples and cut into eights.


Pick (or purchase) several fresh apples. I use 8 apples for this recipe. Harrelson apples are the best for applesauce. Peel the apples thoroughly. The sauce will not taste right if you leave even a speck of peel on the apple. Core the apples and cut into eights.

I made sure to keep all the peelings aside in a bowl to compost after I was done.

Put the apple chunks into a crock pot. Add water (3/4C per 4 apples), cinnemon to taste, and sugar (1/4C per 4 apples). Stir well and turn on high.


Cook for approximately 2-2.5 hours, stiring every 30 minutes or so. Once the apples start to fall apart, remove about 1/4C of water using a dry-goods measuring cup. This will make the applesauce less soupy and more creamy. Use a potato masher to cream the apples and stir everything up well. You can either eat it right away or freeze it for later. I froze some in individual containers to take to work, and some in ice cube trays for later. This is great if you have kids, or just makes it a lot more convenient to store (and you save your containers).


Friday, October 14, 2011
Super (Farmer's) Market Sweep
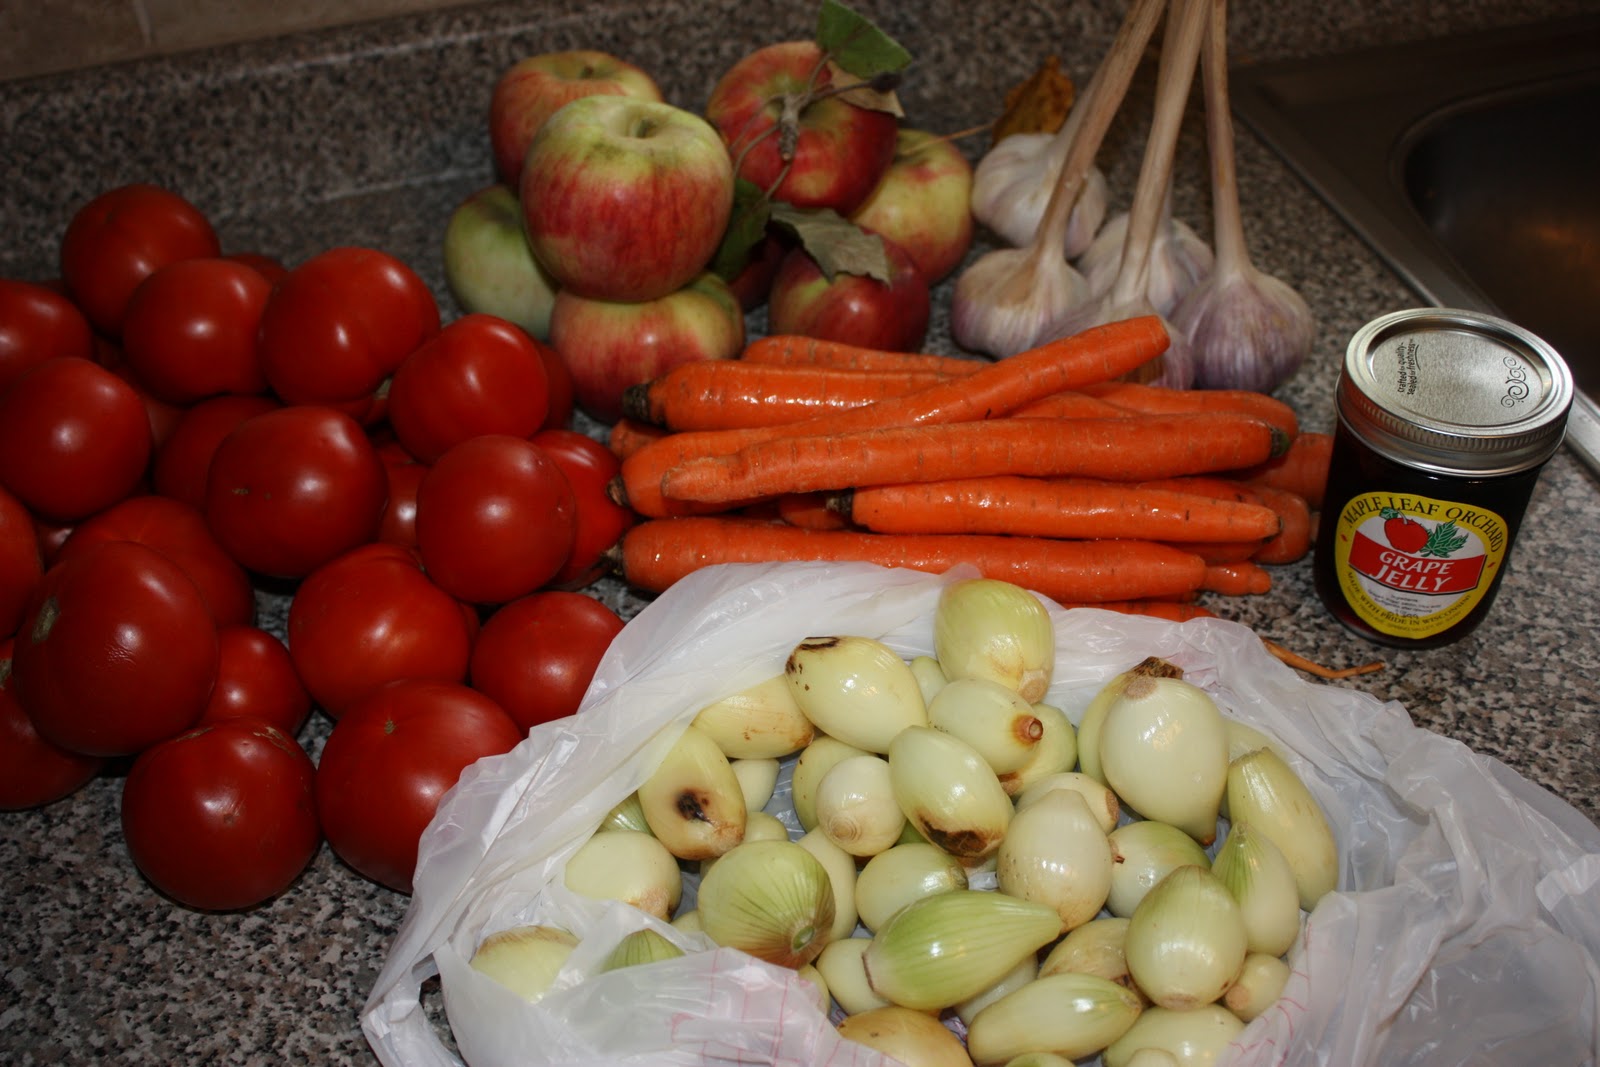
Last weekend while Mark was off in California golfing, I decided to venture out to the St. Paul farmer's market. My co-workers have told me how great this place is for years, and I thought it would be a good time to try it out. Wow, talk about selection! I had no idea there would be so much fresh, organic stuff available. Right as I was arriving a rain storm started, but luckily there is a roof over the shopping area. Veggies, fruits, jams, apples, eggs, meat, soap, flowers, you name it and it was there.
I went a little crazy and bought a bunch of stuff. Then I spent all Sunday making food to freeze for the winter. While I've still got a long ways to go (and Mark has even further), we're really making an effort to reduce the amount of preservatives we eat and cut some of the unhealthy stuff from our lives. I haven't done a list in a while but you can see from older posts the progress we've made over the past several months. Anyways, check out all the goodies I got for only $27! I'll be posting recipes over the next while, showing you what all can be made from these fresh items.

I went a little crazy and bought a bunch of stuff. Then I spent all Sunday making food to freeze for the winter. While I've still got a long ways to go (and Mark has even further), we're really making an effort to reduce the amount of preservatives we eat and cut some of the unhealthy stuff from our lives. I haven't done a list in a while but you can see from older posts the progress we've made over the past several months. Anyways, check out all the goodies I got for only $27! I'll be posting recipes over the next while, showing you what all can be made from these fresh items.
Spicy Chicken Tortilla Soup
As promised, here is my (most current) recipe for Spicy Chicken Tortilla soup. There are a couple of other tweaks I plan to try this fall/winter, so you may see updates in the future. This is a good start though!


I recommend pairing this with the "cracker" recipe posted earlier this week. It helps cut the heat and paired together this is still under 400 calories for the meal!
You put all the below ingredients into a crock pot on low. We cooked ours for 8.5 hours, but that's because we're gone so long during the day. You can probably get away with cooking it for 7, or less if you cook it on high. After you get home and before eating, shred the chicken then add about 1T of sour cream to make it creamy.
3C chicken stock
¾ can chopped tomatoes with peppers
1 diced jalapeno pepper
1 chicken breast, frozen
1 C frozen corn
1C diced fresh onion
½ tsp each – chili powder, cumin, and ground cayenne pepper (I did not measure and it turned out HOT!)


I recommend pairing this with the "cracker" recipe posted earlier this week. It helps cut the heat and paired together this is still under 400 calories for the meal!
Thursday, October 6, 2011
Linen Closet Organization
Being healthy doesn't have to just be a way you eat. It's about the way you live your life. I love organization but have had issues with our linen closet ever since we bought our house. It's a really awkward shape and our sheets and towels are stacked perilously. Every time we get a sheet set out half the closet comes tumbling down on our heads, and we're always losing a pillow case here or there. A couple of months ago I read an article in Martha Stewart Living (don't laugh, my mom got me a subscription for Christmas and it's actually a really great magazine!) about tying towel sets with twill tape for guests. I decided to try this for our sheets to make them more manageable. One package of twill tape (about 2 yards) perfectly fits one sheet set. Last weekend I bought enough twill tape for each sheet set and wrapped them all up in these perfect bundles. Now our sheets stack perfectly in the closet and no longer fall out. What a great tip, Martha!


Tuesday, October 4, 2011
Easy "Crackers"
One of my favorite things in the Fall/Winter is a nice, hot bowl of soup. I've been testing out variations of crock pot chicken tortilla soup (we've almost got it perfected!) and decided to try a cracker substitute tonight to go with our soup. This summer mom and I tried a new lunch place by the cabin, where they served these delicious tortilla type crackers to go with the chicken tortilla soup. So tonight I attempted to duplicate the tortillas.

Directions (I'd make 1 per person)
1 tortilla
1 T olive oil (I used Target's Market Pantry garlic and herb infused EVOO)
sea salt (to taste)
1tsp asiago cheese
Pre-heat oven to 300F. Use a basting brush to lightly coat the top side of the tortilla with olive oil. Sprinkle the tortilla with sea salt and cook for approximately 6 minutes. Remove from the oven, use tongs to turn over, and repeat the olive oil and sea salt ritual. Cook for another 5-7 minutes, until lightly brown and crisp. Remove from the oven and place on a plate. Cut into quarters using a pizza cutter. Optional: lightly sprinkle freshly shredded asiago cheese on top.
Total Calories: less than 200 per person! Did you know that only 5 Ritz crackers are 80 calories? Most people eat way more than 10 crackers with their soup. And this tastes much better.
Planting workout
Did you know that you can burn 340 calories an hour while gardening? The other weekend Mark and I spent over 2 hours doing major Fall yard work to get our plants ready for the bitter Minnesota winter. I trimmed my hydrangeas back (last year I didn't have time and I spent the winter in embarrassment as the giant dead heads rolled around the neighborhood like tumbleweeds. And yes, I am the only one in the neighborhood with those plants so it was apparent who the culprit was), transplanted bulbs from the north side of the house to the south side (something I've wanted to do since we moved into this house 5 years ago), and moved our huge hostas to make room for the new down spouts. It was a big job, but as we were trying to chip through rock and roots, I reminded myself of how many calories we were burning. Gardening is a great workout. You tend to use many muscle groups that normally lay dormant, and it's great cardio if you are digging through rock hard dirt as we were. So if you don't have time for a work out, have lots of yard work like we do, or if you have an elderly neighbor who needs help, get out there and burn some calories while enjoying the weather before the snow comes!
(don't laugh, they're looking a little rough but they should bounce back in the spring)

(don't laugh, they're looking a little rough but they should bounce back in the spring)

Sunday, September 25, 2011
Fall Herb Preservation
This year my oregano plant produced way more fresh herbs than I could possibly use. When the weather started getting cool I decided to try and preserve the herbs for use throughout the winter. My mom gave me this great herb book called "a Guide to Fresh Herbs". This is a fantastic alphabetical reference guide to most herbs, providing directions on planting, preparing, and preserving herbs. I was able to get tips to preserve my oregano. First I cut the stems, then tied string on the ends, and hung them in a dark place (our spare bedroom). Today I checked and they were all dried! Now I just need to strip the leaves from the stems and store in an airtight container. We should have fresh oregano all winter! I'm also excited to use this book next spring as I plan my herb garden. Maybe this year I can keep the rest of them alive longer.

Healthy Blog
One of my co-workers shared this healthy blog with me a few weeks ago. Her friend completely changed her life a couple of years ago, removed all preservatives from her diet, and lost 100lbs. My co-worker constantly references recipes from this blog and they sound yummy, so I thought I'd pass it along! Try out the bird bar recipe. It's gluten free for those of you who can't eat gluten.
http://www.greenandlean09.blogspot.com/
http://www.greenandlean09.blogspot.com/
Monday, September 19, 2011
Fresh Tomato Sauce
In order to use up my fresh supply of organic tomatoes, I decided to try my hand at homemade tomato sauce. It turned out very well, if I do say so myself!
2 fresh, large tomatoes, diced
3T extra virgin olive oil
1/2 onion, diced
2 cloves fresh garlic, pressed
fresh basil, chopped
fresh oregano, chopped
sea salt and pepper, to taste

Wash all ingredients well. After dicing tomatoes and onion, add to skillet on a medium flame. Stir in olive oil and garlic and heat mixture for about 7 minutes until soft. Once tomatoes are softened, take a fork and smush the tomatoes until they're pulpy. Add fresh herbs and salt and pepper to taste, cooking another 10 minutes or so. All the flavors will mix. Serve hot over fresh wheat pasta. Enjoy!

Tuesday, September 13, 2011
Easy Grilled Corn
We hosted a BBQ a couple of weeks ago, which is one of our favorite summer activities. I wanted to have "real" American food because one of my co-workers from Istanbul was coming to join us. I made BBQ pulled pork sandwiches, veggies, s'mores, and corn. When it came to the corn though my biggest pot wouldn't hold all 12 ears so I had to find another way to cook them. I'd gotten a recipe from our gym that showed how to bake corn instead of boiling. It sounded too easy to be true, and I was a little apprehensive to try it. After doing some research online I decided to give it a whirl though, because all the reviews said the flavor was more intense. It ended up really good and I think this will be my new method from here on out!
Whole ears of corn - as many as you want
Butter (or no-calorie butter spray)
sea salt
Heat oven to 350F. Lay ears of corn on a cookie sheet (not required, but this will make it much easier to remove). Make sure they do not overlap. Keep the husks and silks on, although I did trim the silk a bit. Cook for 40-60 minutes. Remove from oven and let sit for 5 minutes or so. Remove husks, add butter and salt, and enjoy!
**Beware, the ears hold heat for about a hour and can still be very hot so don't burn yourselves!
I cut the corn off the leftover cobs and froze in freezer bags for this winter. It tastes just as good as it did when fresh!
Sunday, September 11, 2011
Cantaloupe Help
Has anyone been successful at growing cantaloupe? I could use your advice for next year. This year I started my cantaloupe in a pot on the patio then transplanted it into the ground by my garden (due to space constraints) once it was established. It's thrived and has grown completely up the fencing, wrapping itself around my tomato supports. Despite having produced multiple flowers, I can't get an actual cantaloupe to grow. If you have tips send them my way!
Garden-Fresh Veggies
It's been a while since I updated this blog but now I finally have time to sit down. About 2 months ago my garden finally started producing real veggies. We have enjoyed fresh peas, green beans, and tomatoes during this late summer. It's funny because I've never been a fan of tomato anything (sauce, raw tomatoes, etc) but having your own fresh ones makes a difference. I've made my own spaghetti sauce, chopped them in with guacamole or mango salsa, and in general had fun adding fresh organic veggies to our meals.


Turkey Kabobs
One of my goals this summer is to add more vegetables to our diet. Eating more veggies not only gives you a great vitamin boost but it fills you up so you don't have room for all the junk (aka chips - our big weakness). One of our favorite meals this summer has been Turkey Kabobs. They're easy to make and healthy!
1 Jenni-O turkey fillet (they come in a pack of 3, but we use 1 for the two of us)
Marinade (Lawry's has a 30 minute marinade that comes in many flavors, we like the garlic & herb variety)
veggies of your choice (peppers and onions shown)
kabob sticks
a grill

Place the turkey fillet in a glass container with about 1/2C of marinade. I usually set this up in the morning before work, although it only needs to soak for 30 minutes. Before grilling, remove meat from marinade and cut into 1" squares. Next, cut veggies into 1" square removing seeds and washing thoroughly. Once everything is chopped, alternatively thread the meat and veggies onto the kabob stick. Be careful not to poke too vigorously - I tend to poke my fingers when rushing and it hurts! Heat the grill to 450F and grill kabobs for about 3-5 minutes per side. Enjoy with some rice or pasta!

Monday, July 4, 2011
Garden Update #2

Anyone want to do a veggie exchange later this summer? The garden is looking pretty good, and I'm excited to share that I have two small green tomatoes! My pea plants are now several inches taller than the stakes, and are climbing down the chicken wire fence. The pea, green bean, tomato, and cantaloupe plants all have blooms that promise fresh fruit and veggies. All-in-all it's exciting to see and great to know I haven't killed it (yet). My watermelon plant, which I had figured was a goner, has actually bounced back and is looking ok. Now we'll just have to see if I actually get fruit off it before the frost, seeing how far behind it is.


Subscribe to:
Posts (Atom)